
Elegant Lighting for Vitsoe 606 Shelves: What Parts Do You Need?
If you appreciate the attention to detail lavished on the Vitsoe 606 System by Dieter Rams, love to find clever and elegant ways to enhance, augment, and take advantage of the opportunities it offers, and have been mulling over how to illuminate a wall of it with a magical, seamless glow, you are going to love this essay.
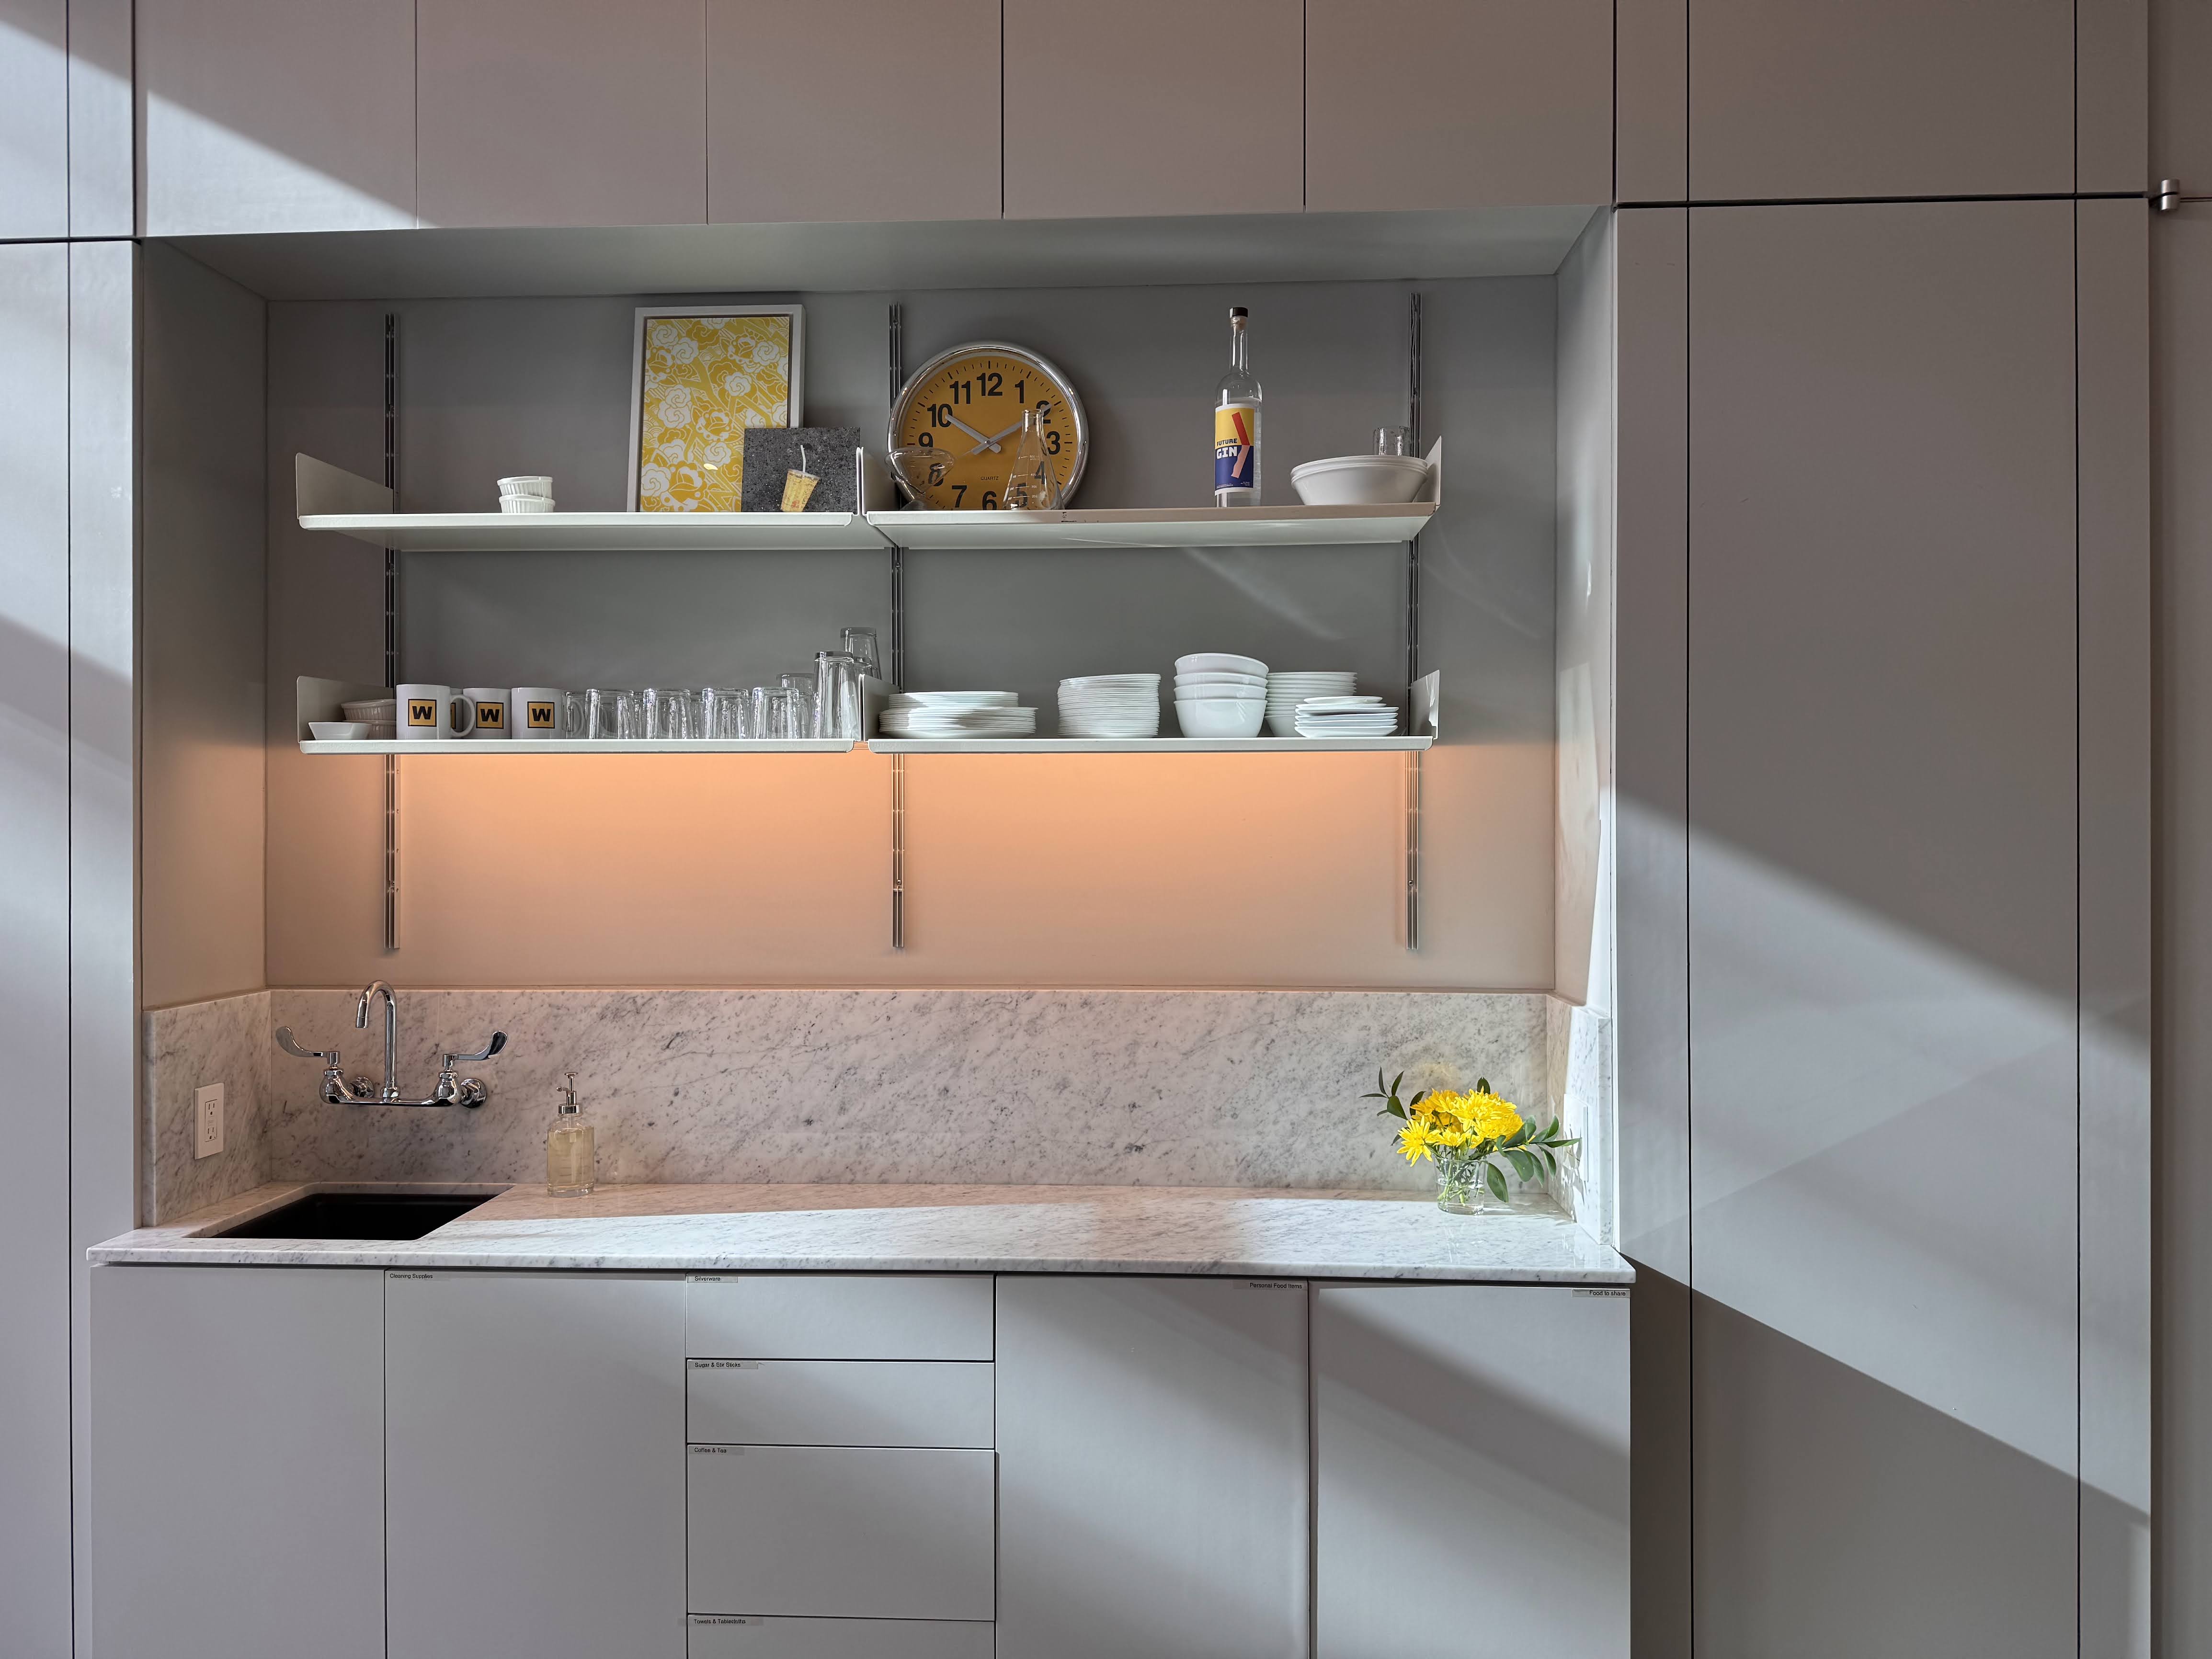
I don’t like glare or seeing bare light sources. I do like Vitsoe. And I so enjoy elegantly concealed lighting. It transforms a room from where I “pile my hoards of bric-à-brac” to one where I can “display a gallery of thoughtfully collected, cherished objet d’art.”
I couldn’t find the lighting solution I wanted out there on the market so have spent the last two years exploring, trying out parts, testing combinations, and refining what I feel works best.
And I have some good news.
Vitsoe shelves happen to be engineered with a beautifully sized flat channel along the front edge, under the lip that is just perfect for tucking away an LED strip. Unfortunately, I did not find any commercially available under cabinet lights that fit; nor is there a clean hidden path to route cables from the shelf to the back, so some effort and planning is required.
But, I do have solutions to share, and the best part? No messy adhesives, no permanent damage, and zero sticky residue. With a little bit of ingenuity, thanks to the magic of magnets, you can readily and cleanly attach, reposition, and move these lights around however suits your fancy and the contents of your shelves.
The front lip of the wide bay is inset from sides, and so allowing for cables, connectors, and material thickness, it is perfectly sized to completely hide a 34-inch light strip. With a strip that size or smaller, you get all of the gorgeous, warm glow without any visible fixture or hardware.
Keeping in mind that all of my 606 components are white wide bay (90cm), all of these parts and measurements are for that size and material. If you have narrow bays or different finishes, you’ll need to make some adjustments.
Depending on your comfort level with a little DIY electrical wiring, I’ve put together two distinct paths: The Custom Pro Build (maximum elegance, ultra-sleek, totally hidden) and The Lightly Hacked IKEA Route (plug-and-play, no wire-stripping required).
Let’s break down what's required for each!
Best Route: The Custom Pro Build (For the Perfectionists)
If you want great light quality, totally hidden lights, and have the patience for sourcing from multiple vendors and connecting some bare wiring, then this route is for you.
A. The LEDs (Don't Skimp Here!)
I love a bargain, but have not had good success with no-name LED strips from Amazon or other sources. They tend to have poor, inconsistent color. I want colors to look good (meaning a 90+ CRI) and strongly prefer a warm color temperature (like 2700K). Many inexpensive LEDs drift green at warmer color temps. So, unless you want your shelves taking on a sickly tint, I encourage you to spend a bit extra on good stuff. I have used and can recommend aspectled.com or environmentallights.com. They both have responsive customer service if you have questions or need anything special.
- Option A: aspectLED Linear Dotless 90+ Strip
- Option B: Environmental Lights 2700K 2216MR
What is COB? You’ll see the term "COB," literally Chip on Board. Functionally, it means that the LEDs look like one continuous, glowing orange/yellow strip instead of a bunch of tiny, pixelated chips. If you use COB strips, then you don’t need a diffuser. If you choose non-COB, get a diffuser to smooth out the bright hot spots of the individual LED chips.
Example Order Spec: When ordering, I suggest you ask for as many custom “34in long COB light strips with extra-long, 72in 2-wire white leads in a white jacket, soldered on one end” as you have shelves to light.
B. Driver
You'll need a way to power and control the LEDs. I use Lutron Caseta wall dimmers everywhere I am plugging in these shelf lights, I just need a compatible driver to power them. If you don’t already have a dimmer, however, you can get a driver with a remote control, or just get a lamp cord with an on/off switch.
- If you’re reading this, you probably don’t already have a suitable case to put this in, so I suggest you get a driver with a metal junction box enclosure. This is a 96W version, which supports up to four of the strips above. (They’re a little under roughly 20W each.)
- If you do already have a case, then there are many bare driver options. I’d suggest starting with a common model like this Magnitude Dimmable LED Driver; it is compact, well labeled, and the manufacturer has been surprisingly responsive when I have reached out.
C. Connecting The Wires
- Wago Lever-Nuts I like Wago. They’re elegant, classic, clean, and easy to use. If you’re a lover of Vitsoe, and don’t already have another wire nut/connector preference, then I suggest you start with the WAGO 221 series. This link is for a 20-piece assorted set, but a smaller 12-piece set, or even single couplers, will work fine for smaller setups. You’ll need one for each cable, meaning you’ll use three direct couplers (221-2401 in Wago terms) for the input side and something like the five port (221-415) to connect up to four LED strips.
- If you go with the metal junction box enclosure, you'll want something to grip and protect the cable as it passes through the holes in the enclosure. These 1/2in NPT Black Nylon Cable Gland are meant for waterproof environments, but look and work nicely here; they work especially well with round power cables like this 18 Gauge 3 Prong Replacement Cable. (But almost any bare lead power cord will do. You can even cut the end off of an extension cord if you know what you’re doing; this Lamp Cord is a simple, basic easy option in white to help it blend with the Vitsoe system.)
Before you start connecting it all together, make sure the equipment is disconnected from power. (That means unplug it from the wall.)
- The driver has an input and an output. The lamp cord will be connected to the input with Wago couplers, using one for the hot (black), one for the neutral (white), and one for the ground (green) wire.
- If you have multiple strips (up to four), use a Wago five way connector, and place the output from the driver in one slot, along with one wire from each LED strip. In the other Wago, place the other wire, and the other half of each of the LED strips.
- Polarity (meaning which cord goes on which side) does matter, especially so on the LED side; if a specific strip doesn’t work, just reverse the polarity of the wires.
D. Mount it with Magnets
Now it's time to connect the light strip itself to the shelf. Take advantage of the inherent magnetic material of the Vitsoe 606 by using a magnetic strip. Many kinds of magnets will do. I suggest a roll of this inexpensive, easy to use, readily available soft, flexible, magnetic strip.
Cut it down to a bit longer than 34 inches long, roll it flat, and adhere it to the LED strip. I suggest starting at the wire or lead end. Lay the magnetic strip adhesive up, peel back the paper strip, and likewise peel back the paper on the LED strip adhesive, aligning them carefully, and then pull off both paper strips as you slowly work down the length until the end. I like to burnish the strips down tight on a firm flat surface (careful not to damage the LEDs or connectors), and when done, I trim off any extra magnetic strip with a sharp knife or pair of scissors. I also leave some weights on top over night to help the two parts adhere. (I use a few nice books as weights.)
Now pop your magnetic lights beautifully into the inside shelf lip, pointing the LED Strips back towards the wall. Since they are magnetic, you can slide it around to experiment with its effects. I prefer to pull it as far down into the lower edge of the lip as possible, but you might prefer otherwise.
E. Hide the Cord
There are a few ways to discretely route the lead or wire.
- Option A: Keep it loose. For high shelves, I route the wire over the top and down the inside corner of the shelf. For the rest of the shelves, I keep it on the underside and tuck it up tight to the side. Once it reaches the back of the shelf, you can follow Vitsoe’s advice and run it down inside the E track channel itself. (I like to put a standard aluminum stud in the next topmost hold to keep the wire up and hanging neatly down.)
- Option B: Use magnetic clips. If loose is too messy for you, then I’ve tried a few different magnetic cable clips and settled on two viable options:
- Magnetic Cable Clip: These run a little too big to be fully hidden, but they are the best I’ve found in white. I use them for lights and shelves I move around often. White seems to fall out of stock more often than black, so you may need to keep checking back until they are available in white.
- I really like these metal magnetic cord holders, but they are a rougher, more industrial look. (They look especially good in other contexts, mounted on galvanized or unfinished metal.) They are a bit smaller than the clips above too.
- Option C: Tape it. For the extra particular among us who are up for a little adhesive on their shelves, Avotaper attaches a very thin strip of adhesive to cables so it can be perfectly, neatly stuck to the edge of the shelf. The results are amazing. Note that they sometimes won't ship to the US due to customs issues. If you fall in love with this option, check back in periodically for updates, or contact them for current options.
Disclaimer: I really hope it goes without saying electricity can cause shock, fire, or death. Any work described here, you do at your own risk.
Good Route: The IKEA Hack (The "I Prefer a Pre-wired System" Option)
If the words "driver" or "Wago" make your eyes cross, you can still build a similar version using off-the-shelf IKEA under-cabinet lights. It's a little less bright, a bit cheaper, and slightly less elegant, but still works very nicely.
The IKEA Shopping List
Luckily, Ikea’s MITTLED under cabinet lights favor my favorite light temperature: a cozy, warm white 2700 Kelvin. And they come in a modular kit of parts that works nicely too, with some clever configuration and caveats.
- 18in MITTLED LED Countertop Strips (504.554.27)
- 15in MITTLED LED Countertop Strips (104.554.34)
- ANSLUTA Power Supply Cord (301.214.11) Connects the power supply to the wall.
- VÅGDAL Connection Cord (704.636.00) Connects the LED strips to the power supply.
- TRÅDFRI Driver for Wireless Control (103.561.89) Power supply, or driver. This one is 10W, and a 15in and 18in together require 9.3 W so it can handle one shelf. To light more than one shelf, get the bigger 30W one which supports up to three.
- DIRIGERA Smart Hub (505.034.14) If you want smart home control and don’t already have a Matter Hub, this is simple and easy to set up.
One 15in and one 18in strip joined together are just a bit smaller than the front of the shelf and stay nicely hidden.
The Secret Sauce for the IKEA Build: Because the MITTLED strips aren't magnetic, you’ll still need something to keep them firmly stuck inside the shelf channel. Grab a pack of these 16 Feet Magnetic Strips with Adhesive Backing.
The Installation Trick: Take these magnetic strips and stack two of them on top of each other right inside the groove/channel on the back of the MITTLED light bar, offset by about an eighth of an inch. Once you've got your double-stacked magnets in place, the top of the magnet is flush with the edges of the LED case. Place the magnetic side directly underneath the shelf, and slide the MITTLED forward until the edge corner catches right under the Vitsoe shelf lip. It should just tuck in. The combination of the magnet in the groove and the physical lip of the shelf keeps your lights locked tightly in position, even if the adhesive of the magnet unsticks.
One key note: These lights will be pointing down not back, so they are more visible. You’ll see them from the side and down below, and the light bleed will wash much more forward and front. For most uses, though, both the custom build and the Ikea hack solutions work nicely.
Which route are you going to try?
Contact me if you have any questions about the wiring or options. And if you do end up building one of these, tag me so I can see that glorious glow.