If you appreciate the attention to detail in the Vitsœ 606 Universal Shelving System by Dieter Rams, enjoy finding clever ways to organize, and have been looking for an analog labeling method that elegantly complements the off-white powder-coated steel shelves, this essay may prove worthwhile.
If you appreciate the attention to detail in the Vitsœ 606 Universal Shelving System by Dieter Rams, enjoy finding clever ways to organize, and have been looking for an analog labeling method that elegantly complements the off-white powder-coated steel shelves, this essay may prove worthwhile.
I dislike that sticky residue from tape, those bits of gooey film left over when removing old VHB, and scratches on powder-coated surfaces. I do like Vitsœ. And I enjoy clean, classic typography. So I’ve been searching for a way to add labels to various shelves around my home that are easily moved around, in keeping with the rest of my aesthetics, and just a bit clever.
A well-labeled shelving system transforms a wall from a place where you "store loose boxes" to a highly functional, beautifully ordered studio workflow.
My father once quipped that a bunch of things are clutter but a bunch of things with a catalog, properly labeled, are a collection.
While it is possible to just print little labels and stick them to shelves, that feels somehow wrong for the 606. There are numerous clunky plastic label holders and label printer options out there but they all felt similarly wrong. The modularity of the shelves means I rearrange my shelves and their contents often enough that I wanted a method that was easy to move. After seeing a set of magnetic concrete poetry words on a friend’s fridge, I opted to take advantage of the naturally magnetic steel of the 606 system. (Much as I did with hidden LED lighting.)
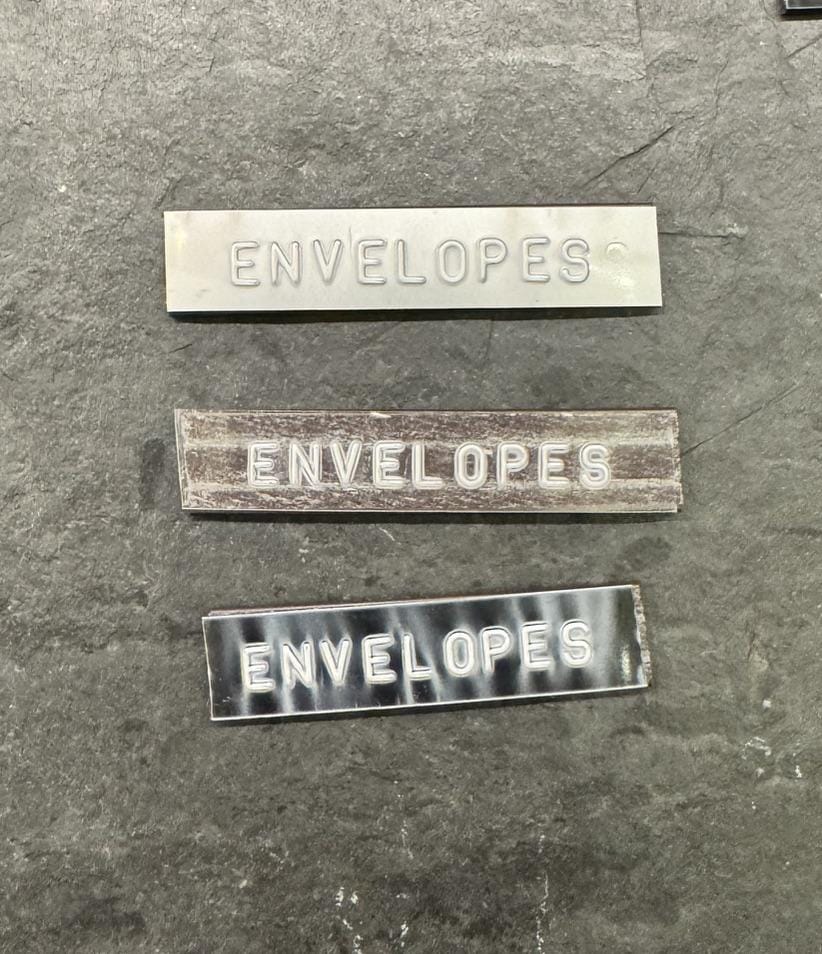
Printing labels and sticking them on a magnetic back worked ok, but I wanted something better, more tactile and physical, I dug around in my (not yet labeled) drawers and found a borrowed chrome industrial Dymo label embosser which works with 1/2in strips of thin metal; the vintage nostalgic quality of the labels were perfect, but the tape was not legible at a distance. I wondered if the more modern but still vintage style on plastic tapes might work even better.
Searching for what types of embossers were still on the market and available, there are a bunch, most are from Dymo or Motex or a few off-market brands. It was tough to tell from listings what the typography and spacing were so I searched, imagining someone must have done a comparison of these half dozen major options -- But I came up empty handed. So I ordered one of each and started doing real world tests.
I was surprised to find how varied they were typographically, how bad the kerning was in some, and how tracked out in others. (In an earlier life I was a graphic designer and so couldn’t bring myself to use ones with downright bad typography.) My favorite one isn’t perfect but it is good.
Since I wanted a comparison and could not find one, below please find a compiled overview of the options I found, shared to save someone else in this situation the same effort. I’ve spent time testing different embossing tools, tape formulations, and mounting methods.
By pairing embossed labels with flexible magnetic tape, you get crisp, raised, tactile labels with a pleasing nod towards nostalgia, that rearrange easily and cleanly.
Here is the definitive guide to embossed labels with decent typography for your 606.
The Clear Winner: Motex E-101 (Best Overall)
After side-by-side testing across various models, from a range of different modern plastic embossers from Dymo and other brands, to vintage metal units, the Motex E-101 Embossing Label Maker was my favorite.
WHY IT WINS
- Typography: Good letterforms. Tracking is sensible and kerning acceptable.
- Reliability: Despite the all plastic build the internal ratchet mechanism advances tape consistently resulting in mostly even letter spacing.
- Legibility: On black tape the white letters are easily readable from a distance. Character depth is distinct and clean. (Clear tape on top of a dark surface was also ok. See the section below on color tapes for a little more on this.)
- Value: Exceptionally affordable, bordering on disposable, at $15-20. (While vintage industrial labellers deliver a compelling alternative they do so at roughly ten times the cost.)
- Object Aesthetics: This model comes in black and white, but since the wheels themselves are white, the visual simplicity of the white is my choice. (There are a bunch of other interesting weird Motex variations, but most of them come in an odd childlike colors or pastels.)
- Compact: Not overly bulky or strangely shaped. Comfortable to use but easy to store.
Pro Tip: Character Wheel Selection: The Motex E-101 is offered in single-wheel and dual-wheel configurations. Stick strictly to the all-caps character wheel. The letter spacing, tracking, and kerning on the caps wheel are the most balanced of all wheels tested. Since changing wheels mid-label is impractical (if there’s a secret technique for that I missed, please let me know!), using the lowercase wheel forces the entire label into lowercase — e.e. cummings style. I couldn't find a compelling design use case for that.
SPECIAL CASE: THE VINTAGE METAL OPTION
Vintage cast-metal embossers (such as the classic Dymo 1570 from the 60s and 70s) are beautiful gratifying objects. They offer undeniable mechanical charm and metal stamping. They are big though, three to five times the size of the compact one above. And at roughly ten times the price of the Motex, I couldn’t justify the premium for shelf labeling. Also, an arguably even more important factor: The output on metal tape looks good but lacks the legibility of the color contrast created by the white embossed letterform on plastic tape.
The one I tested is on loan from my Macktez co-founder, Michael, and it is a beautiful vintage artifact but not well suited to shelf labeling for any but the most obsessive. And new models seem to be painted black, less beautiful and striking than this antique chrome model.
EVEN MORE SPECIAL CASE: TAG EMBOSSERS
At the risk of turning this into a more involved side topic, I did start down the path of exploring larger and more industrial and commercial marking systems. There are whole categories of machines, like the handsome Pannier Roovers Metal Tape Embosser that works on rigid metal tape or strips. But they require a desktop and exceed $6000 so I reluctantly decided these were not really practical here. Magnificent machinery, but far beyond the scale or budget needed for home studio organization.
The Contenders That Didn't Make the Cut
Not all embossers are created equal. In testing the rest of the field, most options fell short for specific, deal-breaking reasons. The letterforms on many of these modern plastic units are overly rounded, chunky, and displeasing. The spacing (kerning) between letters is inconsistent so some letter pairs sit uncomfortably close while others gap wildly. The result looks sloppy and uneven. On many the plastic squeeze mechanism feels flimsy and flexes and squeaks under hand pressure, leading to uneven embossing depth across a single word.
MANUFACTURERS
- Dymo Industrial specifically the M1011
- Motex
- EazyID are a nearly identical copy of the Dymo Organizer Xpress Pro.
- Zodzi and Vixic are some of a near endless and constantly changing assortment of gibberish sounding brands on Amazon and Alibaba.
Motex E-404: Big and clunky, weird bad typography, strange font and tracked way too far apart. It feels like this was designed for somebody with huge hands. All the extra plastic makes it bulky and difficult to store. It didn’t require much less pressure nor was it any easier on the hands and much smaller ones.
Dymo Organizer Xpress Pro: Bigger and clunkier than it needs to be. Letters are way too tracked out. So strange. My model squeaked unpleasantly during use. This style of vintage plastic embosser tape ones are not openly listed on the main Dymo website; almost all of which are thermal tape label printers. (Which are great and absolutely have their purpose, but not here.)
Motex E-303 Seems to use the same wheel as my first choice, but not readily available in the US. And I balked at the childlike pastels and colors. (On the Korean website, there are some interesting variations that I would be interested in trying if I could get my hands on.)
FDIT Embossing Label Maker did not come up in my initial searches, though it is readily findable now, so I did not get one and test with it. The images on the Amazon page imply it is as bad as the Dymo Organizer Xpress Pro, uneven spacing and tracked out.
TAPE COLORS
Tape comes in a variety of different colors and I did not exhaustively test them all. Most come in assortment packs. My personal favorite was the clear. I am attaching it to a little piece of magnetic tape, which is dark gray, and the combination together shows some enjoyable industrial looking variation and streaks, which gives it a nice rough quality. For most people, though, the black or perhaps the red are likely solid choices.
- Black: best, most visible, clean look. Classic.
- Clear: Looks surprisingly good. The adhesive of the tape and magnet show through but since the magnet is dark gray visibility it is pretty good. A close second, maybe even my slightly less practical aesthetic favorite.
- Red: looks great, classic but pops way too much for non emergency labels for my tastes. Save it for your first aid kit.
- Yellow: Same issue, less contrast but still too popping.
- White: Don’t mind it overall but the visibility is too low, just like the metal stamped version.
- Silver: Looks pretty good, and I toyed with it as a favorite for a while, but ultimately decided visibility wasn’t good enough and the contrast is too low. Also balked at the fake aluminum/metal vibe.
- Gold: Nope, no way.
The Magnetic Label Method
Instead of sticking label tape directly to your Vitsœ shelf lip, bond the embossed tape to a flexible magnetic strip. These strips are readily available in the exact same width as embosser tape, and both are easily cut to length with a sharp knife or scissors.
THE ASSEMBLY PROCESS
- Prep the Magnetic Base: Cut a strip of flexible adhesive-backed magnetic tape slightly longer than your intended label length.
- Align and Adhere: Peel back a portion of the protective backing on both the magnetic tape and your freshly embossed label. Starting at one end, carefully press the label onto the adhesive side of the magnetic tape, working down the length to avoid air bubbles.
- Burnish for a Permanent Bond: Place the combined strip on a flat, firm surface. Firmly burnish the plastic label down against the magnetic backing using a bone folder or rubber roller. Press firmly around the edges, but avoid flattening the raised lettering.
- Trim to Edge: Using a sharp utility knife or heavy scissors, trim the excess magnetic tape flush with the edges of your label.
- Stick in Place: Drop your new label onto the front lip of your 606 system. Slide it where you need it as that category shifts.
The Recommended List
If you want to duplicate this magnetic labeling setup on your own 606 system, the complete kit of parts to grab:
- Embosser: Motex E-101 Embossing Label Maker with just the uppercase wheel
- Tape: 9mm (3/8") Embossing Tape in Black or Clear (the former has more visibility but the latter has a good rough look). There are tons of different sources; pick whatever is in stock.
- Magnetic Backing: Soft, flexible magnetic tape with self-adhesive backing; the 3/8in width is just a hair wider than 9mm tapes, which results in a nice rounded edge.
- Tools: A bone folder works well for burnishing. And you’ll need a sharp utility knife or scissors.
Which embosser and tape color combination are you going to try? If you end up setting up magnetic labels on your Vitsœ system, tag me so I can see your organized setup!